IPFS
This guide is for teams who specifically need to manage IPFS hosting themselves. Most creators should use the Scatter Uploader instead.
IPFS Self-hosting
When to Use IPFS
Use manual IPFS hosting only if you already run an IPFS pipeline, need custom pinning behavior, or require a specific gateway setup. For Scatter-managed hosting, use the Scatter Uploader.
File Prep (Quick Check)
- Media files must be numbered
1toNwith no prefixes. - JSON files must be named
1,2,3with no.jsonextension. - See Metadata for fields and structure.
Pinata (Advanced)
Create a Pinata ↗ account.
Upload images and get the images CID:
- Click Add and select folder upload. If you use the Pinata mobile app, the folder upload feature is not available, so you should use the desktop or try Filebase.
- Select the folder with your images in it.
- Once uploaded you will receive a unique CID for the images folder. Save it.
Generate or edit metadata:
- Once you've uploaded your images, you will have the images CID needed to
create JSON files. Each JSON file must point to the correct image, for example
"image": "ipfs://CID/1.png". - If you already have metadata, update the image links with the new CID. You can use https://webtools.scatter.art/update-image-fields/ ↗.
Upload metadata and get the metadata CID:
- Click Add again and select folder upload.
- Select the folder with your completed JSON files.
- Once uploaded you will receive a unique CID for the metadata folder. Save it.
- This second CID is used as your base URI.
Set Your Base URI
After pinning metadata, set your base URI in the Contract tab using the
metadata CID. The correct format is ipfs://CID/.
Unrevealed Metadata
If you want a delayed reveal (not reveal-on-mint), see Generate Unrevealed.
Remove JSON Extensions
It is necessary to remove the .json file extensions of your JSON files before using them with your collection's contract baseURI.
Scatter contracts work by adding your baseURI with the ID of a token to know how to look up that token's metadata. This is why you cannot have .json file extensions on your JSON files.
For example: ipfs://JSONCID/ + 1 = ipfs://JSONCID/1 and not
ipfs://JSONCID/1.json
File extensions can be hidden!
If your OS is set to hide file extensions you may not know that they are there. A quick test would be to upload 1 JSON file somewhere and see if the .json file extension is there.
Don't manually rename JSON files! Human error is common even for a small number of files, better to use the options below.
Windows
Press Windows Key + R together to open the run prompt.
Type cmd and press enter to open the command prompt.
Type cd followed by a space in the command prompt and then drag the folder
where your JSON files are in into the command prompt window and then press
enter.
Copy and paste the following command into the command prompt and press enter.
for %i in (*.json) do ren "%i" "%~ni"
All JSON files in the current folder should have their .json file extensions removed.
macOS
Press Command + Space Bar on your Mac keyboard (alternatively, press F4) Type in “Terminal” When you see Terminal in the Spotlight search list, click it to open the app.
Type cd followed by a space in Terminal. Then drag the folder where your JSON
files are in into the Terminal window and press enter.
Copy and paste the following command into the Terminal window and press enter.
for file in *.json; do mv "$file" "${file%.json}"; done
All JSON files in the current folder should have their .json file extensions removed.
Linux
Press Ctrl + Alt + T to open Terminal on Linux.
Type cd followed by a space in Terminal. Then drag the folder where your JSON
files are in into the Terminal window and press enter.
Copy and paste the following command into the Terminal window and press enter.
for file in *.json; do mv "$file" "${file%.json}"; done
All JSON files in the current folder should have their .json file extensions removed.
Scatter's Webtools
Put your files into a .zip (just files, don't zip the folder containing files).
Drag and drop your .zip to this tool ↗.
Get a new .zip back, all JSON files in the .zip should have their .json file extensions removed.
Filebase for IPFS
This guide is for teams who need to manage IPFS hosting themselves. Most creators should use the Scatter Uploader instead.
More in-depth product information can be obtained at https://filebase.com/ ↗.
Before You Start
Make sure your files are prepared correctly:
- Media files must be numbered
1toNwith no prefixes. - JSON files must be named
1,2,3with no.jsonextension. - See Uploader for file prep and Metadata for metadata fields.
Step 1 - Deploy Your Collection
Follow the steps in Deploying Your Collection.
Step 2 - Content Pinning Using Filebase
Create a Filebase ↗ account.
Upload images and get images CID:
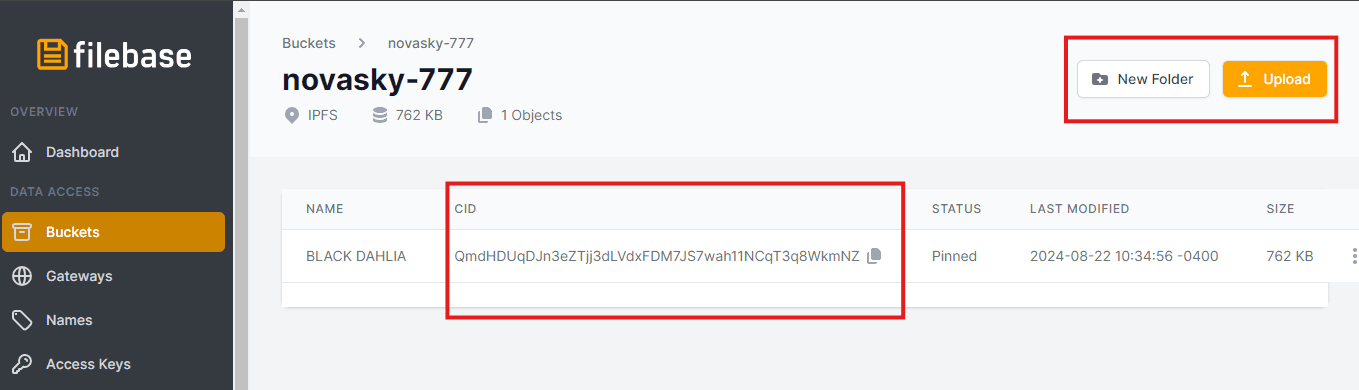
- Click on the top right highlighted Upload button and select folder upload
- Select the folder with your images in it
- Once uploaded you will receive a unique CID of the images folder, highlighted at the bottom left. Copy and paste this CID and make sure you save it.
Generate or edit metadata:
- Once you've uploaded your images, you will have the images CID necessary for
creating the JSON files. Each JSON file must have an image link that points to
an actual image stored on IPFS (it looks like
"image": "ipfs://CID/1.png"). For more about metadata please read Metadata. You can also use https://webtools.scatter.art/ ↗. - If you already have your metadata generated before, you should edit it with the given images CID, so image links are correct. To update image links use https://webtools.scatter.art/update-image-fields/ ↗.
Upload metadata and get metadata CID:
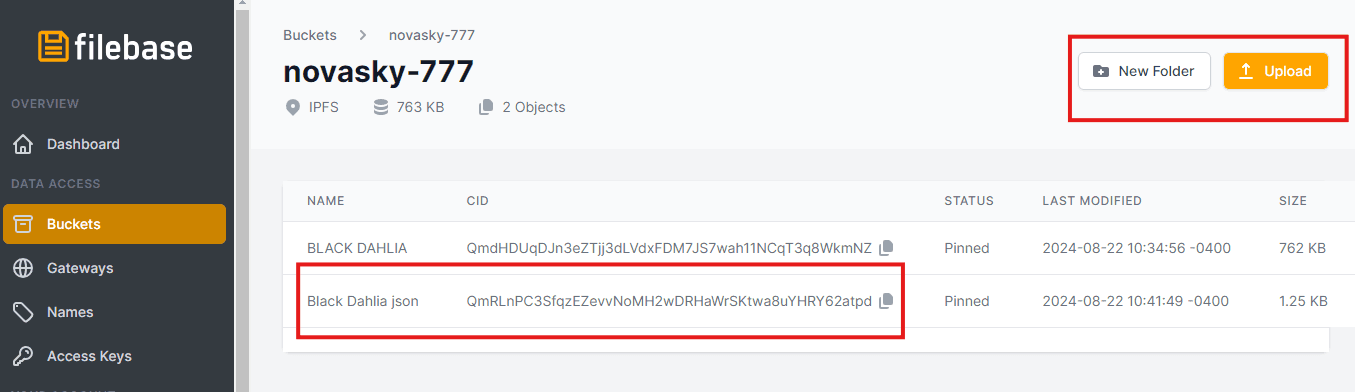
- Click again on the top right highlighted Upload button and select folder upload
- Select the folder with your completed JSON files in it
- Once uploaded you will receive a unique CID of the metadata folder, highlighted at the bottom left. Copy and paste this CID and make sure you save it.
- This second CID will be used to set your base URI in your contract.
Please note - if you have a large collection, uploading it all as a folder can time out depending on the size. I.e. if you're attempting to upload a 20Gb folder, your internet connection can drop for a second and sever that upload connection. Filebase uploads in parallel to help with that via multi part uploads, but in certain cases it can still time out. Most normal-sized collections should be able to upload as a folder with no issue, but if you run into something like a 20k-item collection, bucket CIDs may be a better route:
- Make sure you choose the IPFS option when creating a bucket
- Users can upload files individually one at a time into a Filebase bucket. There's no need to batch-upload all files simultaneously.
- Once all desired files are uploaded, users can select the Generate Bucket CID option. This action instantly generates an IPFS folder CID that mirrors the file structure and layout of the Filebase bucket.
- You can also easily modify files - if you need to change or remove files, simply delete the unwanted files from the bucket and select Generate Bucket CID again. A new folder CID is created instantly, without the need to re-upload the remaining files.
Step 3 - Set Your Base URI
Set your base URI in the Contract tab using the metadata CID. The correct
format is ipfs://CID/. For more detail, see
IPFS Self-hosting.
Step 4 - Set Up Your Collection Profile
Continue with Setting Up Your Collection Profile.
Step 5 - Set Up Mint Lists
Continue with Mint Lists.